Respiratory physiology is an important topic in the undergraduate curriculum. Learn how to clean a spirometer to ensure hygiene in your teaching laboratory.
Watch the video below for an overview of how the new Lt Sensors Spirometer can be disassembled. When used alongside disposable filters, the washable nature of the device reduces the risk of disease transmission - an important consideration in the health and safety of your class.
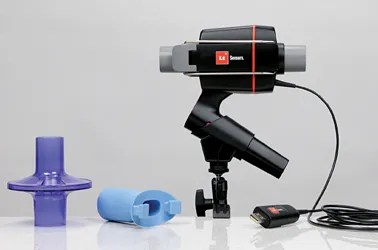
The Lt Sensors Spirometer can be broken down into multiple parts:
- Reusable rubber mouthpiece
- Disposable filter
- Main body with clamps
- Fleisch element
- Front and rear tubes
The only part of the electronic spirometer that cannot be washed is the electronic housing (identified by the attached USB cable).
Importance of hygiene when teaching with a spirometer
Respiratory physiology labs involving spirometry (for example, a lung function practical) require students to breathe into communal lab equipment.
This risks disease transmission via viruses or bacteria in droplets and aerosols in the breath. This risk can be minimized by cleaning the spirometers between each use, wearing gloves, and warning students who are sick not to participate as volunteers in respiratory experiments.
Here, we’re breaking down how you can clean our hand-held spirometer for enhanced hygiene and peace of mind in the teaching laboratory.
How to clean the Lt Sensors Spirometer
The spirometer should be clean and ready-to-use to prevent the transmission of respiratory infections and diseases between volunteers. Use gloves while cleaning.
To clean the device, follow these steps:
Step 1. Remove the mouthpiece and disposable filter

The spirometer can be disassembled.
Disconnect the rubber mouthpiece and bacterial-viral filter. This mouthpiece is reusable, so should be washed. The filter is single-use so should be disposed of according to standard lab protocols.
These bacterial-viral filters have 99.999% bacterial filtration efficiency and 99.99% viral filtration efficiency. They remove water droplets from the air stream and protect against cross-contamination.
While these filters are highly-efficient, they do not guarantee the removal of respiratory viruses from the air entering the body of the spirometer. For this reason, it's important that the other elements of the spirometer are cleaned and dried before reuse.
Step 2. Undo the clamps and remove the electronic components
The metal clamps on either side of the spirometer can be released by pulling back on the gray plastic tabs. This will release the clamps and let you access the internal elements of the device.
Remove the rear piece of the spirometer housing. This contains the electronic components attached to the USB cable, and CANNOT be submerged. This piece can be cleaned with a disinfectant wipe.
Step 3. Disassemble the remaining components
Remove the white plastic Fleisch element, front and rear gray tubes, and the rubber gaskets (inside the gray tubes).
Step 4. Wash
Make sure you have also collected any used nose clamps.
Completely immerse the mouthpiece, main body, Fleisch element, front and rear gray tubes, and nose clamps in a pan containing a 5% bleach solution for 5-10 minutes. Periodically agitate the parts while they are submerged in the cleaning solution; swish it back and forth in the cleaning solution for 10-15 seconds every minute. After agitating the parts each minute, lift the parts from the pan and let them drain. Replace them in the pan, so that they fill with cleaning solution and soak for another minute.
At the end of the cleaning period, remove the parts from the pan of cleaning solution. Set them on paper towels to drain as you put on clean gloves.
Rinse the parts with deionized water at least 6 times. Use a squirt bottle of deionized water to rinse the lumen of the mouthpiece (and clean-bore tubing if you have used it) and the crevices inside each component of the device. Drain the final rinse water from the parts by setting them on fresh paper towels.
NOTE: DO NOT wash the electronic housing that is connected to the USB cable.
Step 5. Dry all components
For the spirometer to function properly, all elements must be dry. Water on the screen on the Fleisch element or in the tubes impairs airflow. To dry the parts more rapidly, use a can of compressed air to blow away any moisture. If your laboratory has a compressed air system, do not use it unless the system has a filter to remove the oil that condenses in the air lines.
Finally, to ensure there is no moisture in the parts, dry them with a hair dryer.
Step 6. Reassemble the spirometer
Reassemble the mouthpiece with a new disposable filter, and attach them to the spirometer.
The whole cleaning process usually takes ~20 minutes.
Important features of a teaching spirometer
The ideal teaching spirometer makes teaching and learning easy by being easy to use, clean, and store. The new Lt Sensors Spirometer has been designed specifically for physiology educators to optimize the lab experience. In addition to being easy-to-clean, the spirometer is...
Hand-held and light
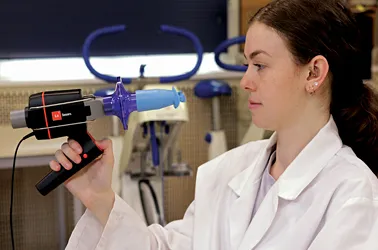
The Lt Sensors Spirometer can be held with one hand, meaning that students can easily record breathing data.
Its small size makes it easier to handle, store, and transport, while less dead space allows for more natural breathing and a better chance of recording textbook values with inexperienced students.

The spirometer can be held in one hand.
Ergonomic design
The result of an extensive design process, the spirometer has an ergonomic, angled handle and a thumb grip to help hold the spirometer level. No other spirometer available today has a design quite like ours!
If you’re looking to perform experiments that require hands-free use of the spirometer - for example, during strenuous exercise - you can do this easily by using the Spirometer bracket accessory and clean-bore tubing (available in the Lt Sensors Human Respiratory Kit) to allow for head movement.
USB connection
Rather than setting up a PowerLab and spirometer pod to record breathing variables, students can plug in the USB sensor and start sampling data immediately.
This portable spirometer also means that students can learn inside and outside the classroom - making your teaching far more flexible.
Integration with learning resources
The new spirometer also integrates with Lt, which centralizes data collection, analysis, lesson content, assessment, and course administration in one place. It’s a total teaching solution for physiology - and we designed it that way, to make it easier for students to learn and for you to teach.
Labs that you can teach with a spirometer
You can save time by combining the spirometer with a variety of respiratory lab practicals. Here are some ideas for topics that you can teach with the Lt Sensors Spirometer:
Airflow
Record spirometry signals and analyze these to derive dynamic respiratory parameters, such as forced expired volume in 1 second (FEV1). Compare these with parameters derived from a simulated airway restriction exercise. Students also learn how to perform peak flow tests to assess pulmonary function.
Cardiorespiratory Effects of Exercise
Record an ECG, blood pressure, and respiratory movements from a healthy volunteer, and compare the recordings made when the volunteer is at rest, during exercise, and immediately after exercise. Students will examine which factors that control heart rate, blood flow and ventilation before, during and after exercise.
Lung Volumes
Record and analyze spirometry signals to derive static respiratory parameters, such as lung volumes and capacities. Perform basic tests of pulmonary function and simulate breathing with hyperinflated lungs.
Mechanics of Ventilation
Examine mechanical properties of the lung and chest wall by measuring pressures generated passively and by contraction of expiratory and inspiratory muscles.
All of these labs can be found in the Lt Sensors Human Physiology Collection, and are completely editable. Combine them with ready-made pre-lab preps for a complete physiology teaching solution.
The best way to teach respiratory physiology
Introducing a hand-held, digital spirometer to your classroom can make teaching simpler and increase student engagement. If you have any questions about using a spirometer to teach in your physiology course, get in touch!
Keep an eye out for future content on how to read a spirogram.
Contact an Education Specialist to start using the Lt Sensors Spirometer

